How to submit an S&S GB ENS declaration on ENS Ready?

If you are moving goods into Great Britain by ferry or short sea route, you need to submit a Safety and Security GB Entry Summary Declaration (S&S GB ENS) before the goods arrive. This guide walks through the process step by step using ENS Ready, a self-serve platform for submitting GB ENS and EU ICS2 declarations.

What Is a GB ENS Declaration?
A GB ENS (Entry Summary Declaration) is a pre-arrival safety and security declaration required for goods entering Great Britain. It gives UK customs authorities advance information about a shipment before it crosses the border. Most declarations are accepted within around five minutes of submission. Once accepted, you receive a Movement Reference Number (MRN), which is used in the Goods Vehicle Movement Service (GVMS) to create a Goods Movement Reference (GMR).
Who Needs to Submit One
Anyone moving goods into GB on a RoRo (roll-on roll-off) ferry route generally needs an ENS submitted before departure. This applies to freight forwarders, hauliers, and customs brokers managing UK-EU movements, whether the load is accompanied or unaccompanied.
Step 1: Choose Accompanied or Unaccompanied

At the top of the ENS Ready form, select whether the movement is:
Accompanied, meaning the driver travels with the trailer or vehicle
Unaccompanied, meaning the trailer travels without a driver, typically as freight-only
This choice determines which fields appear further down the form, since accompanied and unaccompanied movements carry slightly different transport data requirements.
Step 2: Fill in Transport Details

The Transport Details section captures how and when the goods are moving. You will need:
Custom Reference, your own reference number for the movement
Ferry Operator, selected from a list of operators
Country of Routing, the countries the goods are routed through
Departure Port and Arrival Port, selected from a port list
Unit ID, the identifier for the trailer or unit
Expected Date of Arrival and Expected Time of Arrival, used by customs to match the declaration to the actual crossing
Step 3: Add Consignor/Sender Details
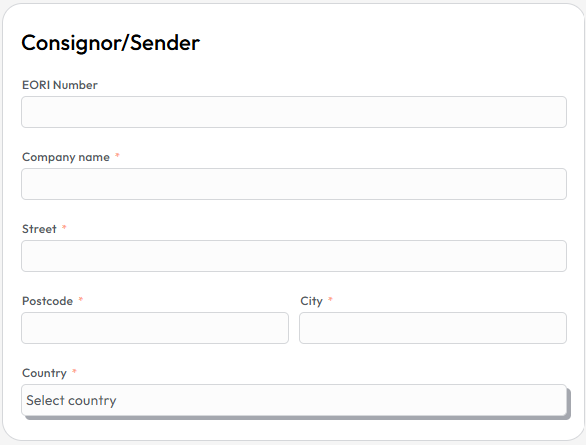
This section covers who is sending the goods. Fields include:
EORI Number of the consignor. This is an optional field.
Company name
Street, Postcode, and City
Country
The EORI number identifies the trading business to customs across the UK and EU, so double check it is correct and active before submitting.
Step 4: Add Consignee/Receiver Details

The Consignee/Receiver section mirrors the consignor fields but for the party receiving the goods:
EORI Number of the consignee. This is an optional field.
Company name
Street, Postcode, and City
Country
Step 5: Enter Carrier Details

The Carrier Details panel lets you toggle between a GB EORI Number or an EU carrier identifier, depending on which country the carrier is registered in. Enter the carrier's EORI number here so customs can identify the party responsible for transporting the goods. If the carrier is an EU company, the address details will also have to be added.
Step 6: Complete Consignment Details

Consignment Details cover the shipment as a whole:
Total gross weight, the combined weight of the consignment
ENS Requestor EORI, the EORI of the party requesting the declaration
Place of Loading (optional)
Place of Unloading (optional)
The two "optional" fields are worth filling in, since more complete data reduces the chance of queries from customs.
Step 7: Add Goods Details
The Goods section is where you list what is actually being moved. For each line you need:
Description, a clear description of the goods
Hazardous UN code, if applicable
Type of Package, selected from a package type list
Number of Packages
Shipping Marks
If you are submitting a shipment with many goods lines, ENS Ready supports an Import CSV table option so you can bulk-upload goods data instead of entering each line manually. Otherwise, use Add Good to add lines one at a time.
Step 8: Submit and Get Your MRN
Once every section is complete, submit the declaration. Most GB ENS declarations are accepted within around five minutes. On acceptance, ENS Ready returns a Movement Reference Number (MRN). This MRN is what you use in GVMS to create the Goods Movement Reference (GMR) needed for the crossing.
Frequently Asked Questions
What is the difference between accompanied and unaccompanied GB ENS declarations?
Accompanied means the driver travels with the trailer. Unaccompanied means the trailer moves without a driver. The form field requirements differ slightly between the two.
How long does it take for a GB ENS declaration to be accepted? Declarations are usually accepted in around five minutes.
What do I do with the MRN after my GB ENS declaration is accepted? You use the MRN in the Goods Vehicle Movement Service (GVMS) to create a Goods Movement Reference (GMR), which is required for the crossing.
Can I submit goods data in bulk on ENS Ready? Yes. ENS Ready supports importing a CSV table of goods, which is useful for consignments with multiple goods lines.
Submit Your GB ENS Declaration
ENS Ready is built for freight forwarders, hauliers, and customs brokers who need a straightforward way to submit GB ENS and EU ICS2 declarations. Try it at ensready.com to submit your next declaration.


Comments